CREATING A GALLERY WALL

We all have envy for those amazing, grand gallery walls that just look so perfect. Have you ever wondered how these are created? Follow along for 5 simple (as in: anyone can take on) tips to achieving the perfect gallery wall.

FIND THE WALL
This might sound simple, but selecting the perfect wall is one of the most challenging steps. When selecting any art for a wall space we need to look at a few factors, such as impact. A gallery wall is a large installation and we need to take in to account if the wall is going to be looked at everyday? Will it be seen from afar or up close, such as a hallway? Don’t be scared to layer a gallery wall on a bold colour, wallpaper, shiplap or even wall paneling.


THE PIECE
A perfect gallery wall can be created from the same frames, same sized frames and the same spacing or a mix of new, old, large, and small frames. Come up with a theme and keep this running throughout the collection. Maybe all the frames are the same colour, or maybe all the frames are different but cohesive (for example: select three top colours such as white, wood and black). Another suggestion would be to keep all the matting the same colour, but as long as there is something running consistent throughout, don’t be afraid to mix and match.
PLOT IT OUT
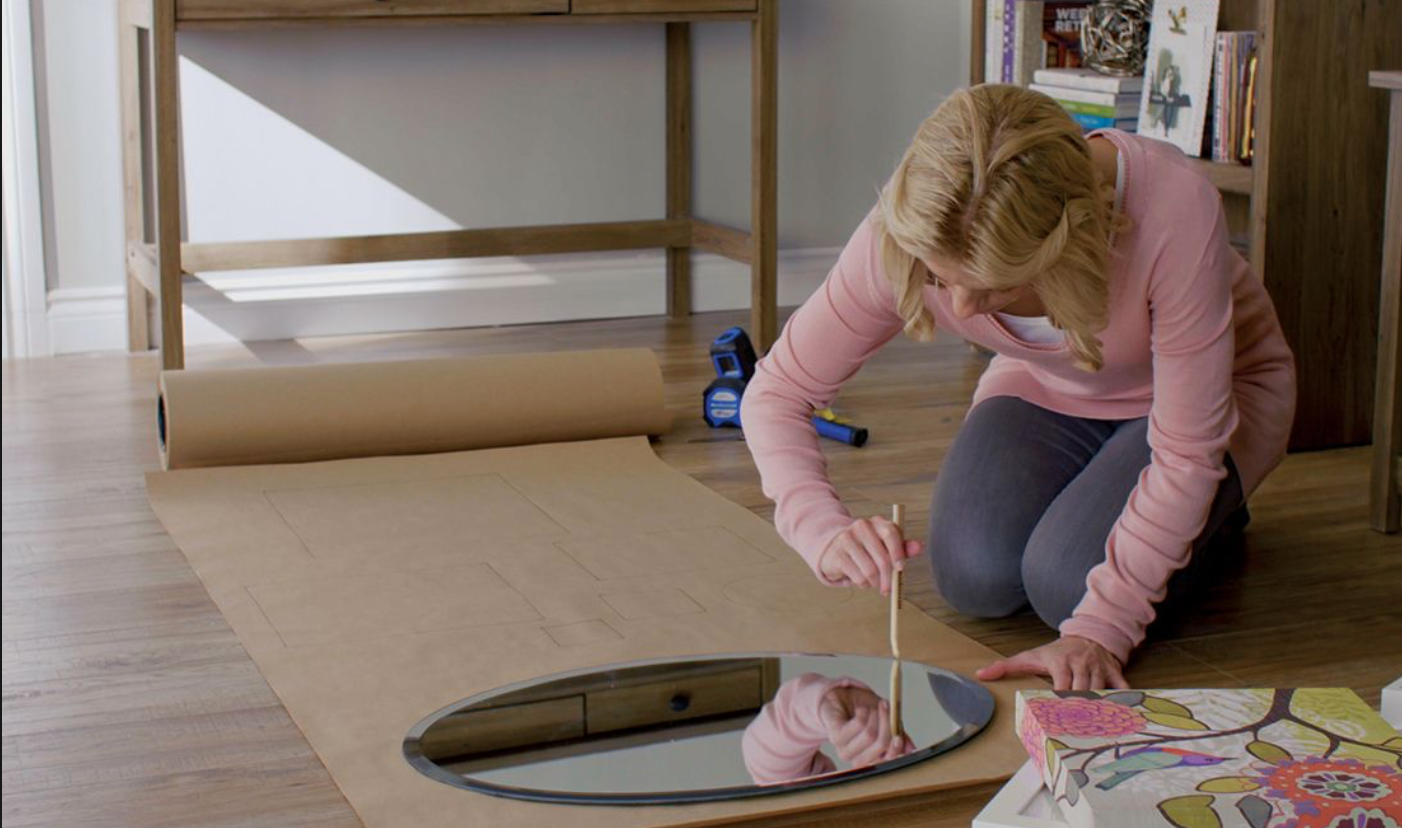
Laying out your framed art on the floor is a good way to map out the pieces. It lets up take this one step closer to the real thing. Take some craft paper on the wall with some painters tape. This will give you a true look at the overall impact.


SPACING OUT
When laying out the craft paper, think about scale. Not only the scale between the frames (both frames and mattes) but also the scale of the entire wall. Use the wall (floor to ceiling) as a frame and tackle it as if you were working with one single image. The cluster of frames will impact as if it were one piece. Leave the same amount of space between frames so that the installation doesn’t appear messy; 2 inches is a good starting point. Too much space (more than 5 inches) or uneven space between frames can make the arrangement come off as haphazard.


FINDING THE ONE
Find a focal piece. Large or small, this will be the piece that eyes will be drawn to, then start mapping out your grid from here. Once common mistake most homeowners make is that they are afraid to go too low or too high. This brings us back to selecting the perfect wall and understanding what impact this might be. If you leave an 8” border on left and right ends of the wall, you should also leave an 8” border under the ceiling and above the floor. This will create the perfect impact and a cohesive look on the wall.


TAKING YOUR TIME
Once you think you have all the craft paper laid out the way you want, leave it up for a few days. Go about your daily routine for the morning, afternoon, and evening and get a physical feel for the layout. Don’t be scared to pull some tape down and move them all around when one piece feels off. Once you’ve taken some time to perfect the overall look, you can start hanging your art. An important tip: first install your hardware and then peel off the craft paper before hanging the piece of art. Be sure to use a level and a tape measure for precision.
Design Hack: pick up some felt and chair floor pads and place them on the inner lower corners of the art. This will keep the art from moving around.
Leave a comment below, and even share some of your gallery wall projects! We would love to see them.